Homesteading In The Pacific Northwest

Monday, December 10, 2012

Harvest Monday and Kalamata Olive and Rosemary Artisan Bread

The Dark Days are here and it will soon be winter.  I have a few greens started in the greenhouse but no harvests to report. I'm joining other bloggers over at Daphne's Dandelions as we share our weekly harvests (or lack of same) ... it's fun to see what others are harvesting and what they are cooking up with it...check it out!

I've been playing with my Easy Artisan Bread Recipe .  I'm still working on a wheat variation but the Kalamata and Rosemary Loaf is a keeper!


The recipe starts out the same as for my basic Easy Artisan Bread ...

Ingredients:
3 cups warm water
6 1/2 cups flour
2 tsp sea salt
1 1/2 tbsp instant yeast

Dump all of the ingredients into a mixer bowl and mix on slow speed just until all the ingredients are combined and form a soft dough ...


After mixing I removed half of the dough and set it on the hearth to raise for some plain loaves and then added chopped Kalamata olives, chopped fresh rosemary and some coarsely ground black pepper to the dough remaining in the bowl ...


... turned the mixer back on for about a minute, dumped the dough into another plastic container ...


... and set it on the hearth to raise for 2 hours.  I put the dough in the refrigerator overnight and the next afternoon formed half of it into a loaf on a piece of parchment paper. I set the oven to 450 degrees, set a baking stone on the top oven rack, set the lid from my turkey roaster on top of the stone and closed the oven door. 


 After 30 minutes I sprinkled the rest of the flour onto the risen loaf and made 3 slashes in the dough with a serrated knife ...


I opened the oven door and (using pot holders) set the roaster lid aside, slid the parchment paper with the loaf onto the hot baking stone and covered it with the hot lid.  30 minutes later I had a beautiful loaf of fragrant olive and rosemary bread.  It was great with a bowl of my "Countdown Beef Stew"  (recipe coming soon).


Enjoy!


Tuesday, December 4, 2012

Storing Potatoes, Onions and Squash ...

You may remember that last year I started using our "Hobbit Hole" as a root cellar.  Well, it turned out that it was not that brilliant an idea after all (sorry, FitzGyver).  The humidity during our winter months (otherwise known as the monsoon season) was way too high out there and a lot of my produce ended up getting moldy.  After assessing other areas I found that the area in the garage where I have my pantry storage will also work well for root cellaring.  The temperature in the summer doesn't go above 60 degrees and in the winter months it stays above 45 degrees with an average humidity of about 50%.


Before S&S Produce closed for the season I bought 50  pounds of red potatoes and 50 pounds of Yukon Golds.  Steve brings these in at the end of the season especially for people who plan to store them over the winter months ... they've been kept cold and in the dark.  And at 36 cents a pound it's definitely worth finding room for them. They last pretty well as long as I keep them covered and when I start noticing signs that they are beginning to sprout I can use other forms of preserving (more about that later in this post).


I also bought 50 pounds of onions at 28 cents a pound.  If I rotate the bag once a week so the ones on the bottom move to the top these onions will last until spring.


I bought hard squash at 50 cents a pound ... I use the delicatas and acorns first as they have the shorted storage life ... the butternuts will last for months.


I guess I ought to explain my rationale behind buying as opposed to growing these.  I have grown all of these in my garden so I've proved to myself that if the SHTF I can grow them if I need to.  But at these prices I prefer to use my garden space for other things.  And all of the produce was grown in Washington or Oregon so it meets my criteria for "buy local :).

Now, about preserving ... some of the Yukon Golds on the top of the box are just beginning to sprout a bit so I am freezing them a few at a time as I find ones that need it (I check the boxes carefully once a week).  Yes, I could can them but I really don't like the texture of canned potatoes (I am going to dehydrate some of them).     
I did a batch this week that I diced to be used in soups and stews or for fried breakfast potatoes.

I peeled and diced the potatoes and set them in a bowl of cold water (keeps them from discoloring) while I prepared a pot of boiling water.


I then transferred the potatoes to a colander, placed it in the pot of boiling water and blanched the potatoes for 3 minutes (if you freeze raw potatoes the will become mealy).


After three minutes I placed the colander in my kitchen sink which had been filled with ice water.


When the potatoes were cold I placed them on a cookie sheet lined with parchment paper (the potatoes stick to the metal sheet but are easy to separate from the parchment ... and the parchment can be reused) and blotted off excess water with a clean kitchen towel.

I put the cookie sheet in the freezer for about 6 hours and then popped the potatoes off of the parchment ...


And sealed them in freezer bags with my Food saver.


As more of the potatoes need to be preserved I'm going to do some as sliced for Potatoes Au Gratin and others I will mash with butter and milk and freeze to have mashed potatoes ready to thaw whenever I need them.

Enjoy!


Friday, November 9, 2012

Pea Soup In A Jar(s)


 Pea (or Bean or Lentil) Soup In A Jar(s)

I made a batch of this on Tuesday ... it came out great!

 1) One pint dried peas, beans or lentils (soak bean overnight first)

 2) One quart homemade chicken stock

 3) 1/4 pint dried veggies and seasonings (my mix is 3 tbsp dried carrots, 1 1/2 tbsp dried chopped onions, 1 tsp garlic powder,1/2 tsp dried thyme, 1/2 tsp celery seed, 1 tsp dried parsley and 2 bay leaves ... I make up several jars at a time a use a Food Saver jar attachment to seal them ... ok, a confession... I use Augason Farms dried veggies ... I have arthritis and chopping up all those veggies for the dehydrator is NOT on my list of things to do)

 4) 1/2 pint canned ham ...

Throw everything everything except the ham into a crock pot set on high. Add 2 cups water. Cook for 4 and check ... you may need to add more water.  Cook for 2 more hours ... check the peas for doneness (these were stubborn, I had to cook the a couple more hours).  If the peas are starting to fall apart add the ham and cook one more hour.  Serve with some crusty bread or rolls.

 Enjoy!


Wednesday, November 7, 2012

Pumpkin Bread Mix In A Jar


For the mix, layer the following in a quart canning jar in order given:
2 cups flour
1/2 cup sugar
1 tsp baking soda
1tsp salt
1/2 tsp ground cinnamon
1/2 tsp ground cloves
1/2 tsp ground nutmeg
1/2 cup chopped walnuts or pecans
1/2 cup raisins

Additional Ingredients:
1 cup mashed pumpkin
1/2 cup plain low-fat yogurt
1/2 cup honey
1/4 cup softened butter
2 large eggs

Optional:
Sprinkling sugar crystals

Place the pumpkin, yogurt, honey, butter and eggs in a large bowl and stir together with a fork.  Add mix ingredients to the wet ingredients, stirring just until moistened.  Spoon batter into a greased loaf pan, sprinkle with sugar if desired and bake at 350 degrees for 50 to 60 minutes (check for doneness with a toothpick).  Cool in pan for 10 minutes and then turn out onto a rack and allow to cool.


Enjoy!


Monday, November 5, 2012

Meals In Jars ... Chicken Noodle Soup


Chicken Noodle Soup

1) I sauteed the chicken and vegetables with some herbs in a bit of olive oil and then froze it in a Food Saver bag. Of course, you could can it as well, as long as you keep the noodles separate.

 2) A quart of homemade chicken stock

 3) A pint of uncooked egg noodles.

Dump the stock in a pot and bring to a boil. Add the noodles and simmer for about 8 minutes. Add the chicken and veggies and continue to cook until everything is heated through.

Enjoy!


Monday, October 8, 2012

Harvest Monday ... They're Ba...ack!!

I really did have the best intentions of keeping my blog up to date ... but we had an unusually long, warm summer here in the Pacific Northwest which resulted in ...


I have been spending my days the last couple of weeks harvesting and preserving tomatoes without much time for anything else ...

This is what I picked just this morning ...


Today I'm going to do the harvest side of the tomato report and join with the other gardeners on Daphne's Dandelions and then for Thursday's Kitchen Cupboard with Robin I'll share photos and recipes for all the goodies I have been putting up.

First, the Keepers.

The star performer this year was San Marzano.  The plant, a semi-determinate heirloom, was a gift from my gardening friend Dorothy and will be on my "must grow" list from now on.


I have harvested close to a hundred of these pear shaped paste tomatoes and there are still at least that many still ripening on the plant!

Another winner was Amish Paste.  Another heirloom, this was my first year growing this variety and it's a definite keeper.


These are really big paste tomatoes.  It is a late season variety and I need to remember to get it started early so all of the fruit can ripen before the first frost.

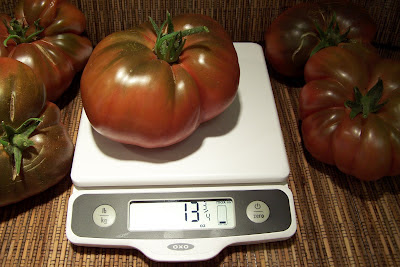
An oldie but goodie, my Cherokee Purple outperformed itself this year ...


Another heirloom, these are huge beefsteak tomatoes ... great tasting and great for slicing onto a hamburger or BLT.

Another gift from Dorothy, Indigo Rose was a bit of a surprise.


The fruits are much smaller than I expected them to be, but their unusual color and taste made them a perfect addition to a salad.


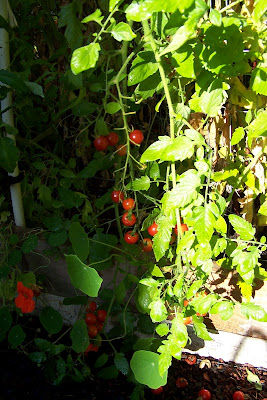
And finally another all time favorite, Sweet 100.  There have been many "upgrades" to this variety but the original is still my choice for a cherry tomato.


And the list of "don't bother with these again" ...

Oregon Spring: grows and produces well but the fruits are tasteless and a bit meally.

Sungold: I just don't like the way these taste.

Saucy Paste: not as prolific as Amish Paste or San Marzano and much smaller fruits.

Brandywine: I can never get this one to grow well.


The "give them one more chance" list ...

Siletz: plants were mislabeled and accidentally discarded.

Stupice:               ditto

Micro Tom: I over planted the basket.


And finally the list of "new to me" that I will try next year ...

Bloody Butcher, Moskovich and Marmande.

That's it for the tomato harvest report of 2012 ...

Enjoy!


Friday, September 14, 2012

Thursday's Kitchen Cupboard ... Enchilada Sauce

Here is a before and after picture of my home canned enchilada sauce...

You can find the recipe and directions for the sauce here on the Canning Homemade web site. I did add one of my home grown cayenne peppers for a little heat ... it tastes great! I had a can of "Old El Paso" sauce in the cupboard ... the ingredients include MSG, soy protein, yeast extract and soybean oil ... I'm not going to miss any of those in my home canned version. Thanks for the recipe, Cindy!

I am adding this to Thursday's Kitchen Cupboard. Join Robin to find out what others are cooking up from their garden produce.

 Enjoy!


Tuesday, September 11, 2012

I'm Back ... and Pippin!

Wow!  I just realized that it has been almost a month since I posted.  Things have been very busy here on the Cove!  First I has held hostage by  my new loom for quite a while; weaving is totally addicting! (Photos coming soon, Laura :)  Then there were 80 pounds of tomatoes to be canned, an update/remodel of the garage pantry to make it more earthquake proof (post coming soon), planting the fall/winter garden (another post soon) and, most recently, traveling to Spokane to bring home our new puppy!


This is the photo I fell in love with when I saw it on the Silver Paw Cavachons blog.


Mike and I drove to Kristy's home in Spokane on Sunday to meet him ... it was love at first sight.  We named him Pippin (after one of the hobbits in Lord of the Rings).


Today he is exploring his new home ...


... getting to know his new best friend ...


... and just hangin' out with the rest of the pack.

I'll post about all the rest of the gardening and home keeping activities soon, but today I need to finish Pippin proofing the backyard (he's small enough to get through the fence).

Enjoy!


Sunday, August 19, 2012

Today .. Aug. 19, 2012

I bought a loom!  It's an Ashford 20" Knitter's Rigid Heddle and I am having so mush fun!  FitzGyver claimed my first finished piece, a short scarf (short because one of my warp threads broke and I didn't know how to fix it) in a bright turquoise (Mike's favorite color).  I dyed commercial yarn for the warp and the weft was my own home spun ... Pics to come soon.  My second piece is still on the loom; almost finished.  This morning I'm spinning the yarn for the warp of my next piece ... some nice Corriedale Top that I bought last year from WC Mercantile on Etsy. I should be able to finish a couple hundred yards this morning ... and then I really need to get out into the garden, harvest and process the celery and get some fall veggies in the ground ... more to come ...

Deb

Wednesday, July 25, 2012

Monday, July 23, 2012

Harvest Monday ... and Pickled Beets

I'm joining other bloggers over at Daphne's Dandelions as we share our weekly harvests...it's fun to see what others are harvesting and what they are cooking up with it...check it out!

The garden is producing more than we can eat now so I am busy canning, dehydrating and freezing. Yesterday I pulled some potatoes and carrots to go with our chicken piccata dinner ...


I also pulled a bunch of my chioggia beets ...


and turned them into the prettiest pickled beets I've ever seen :) 


I used the recipe on Cindy's (SB Canning) web site for the beets.  You can find it here.

Enjoy!


Tuesday, July 10, 2012

A Tuesday Tutorial ... Drip Irrigation

With so much of the country experiencing drought conditions I thought now would be a good time to update my drip irrigation information.  In April of 2011 I posted about the system I set up then.  When we tore everything up last spring I updated the system and added some Dripworks components to the system.

Here is the system that goes to the raised beds coming off of a faucet next to the greenhouse ...


I bought two of these timers, one for the greenhouse and one for the raised beds.  This one works fine for the greenhouse, but I want one that will allow longer and more frequent watering for the beds.  I'm going to order one of these instead (I need another one anyway for the terrace garden on the lake side of the house so this one will still find a home).  After the timer a Y Filter is attached and then a 30 PSI pressure regulator followed by an Easy Loc Fitting (when Dripworks says that these are easier to use than compression fittings they are right!)  Next the fitting is attached to the 1/2" tubing that goes to the beds.  When we rebuilt the garden FitzGyver added water and power lines plus the 1/2" tubing to the beds ...


...  Raindrip compression T fittings (here's a picture ... I bought mine at the local Ace Hardware) take the tubing from the main line to each of the beds where they are closed off and then attached to some 1/4" tubing (again, from Ace Hardware) using a hole punch and a barb connector...


... a 1/4" Vari-Flow Valve was then inserted ...


... allowing me to turn off the drip system to any of the beds that are currently not in use.  1/4" Emitter Tubing was then attached (I found some with 6" hole spacing at the McLendon's Ace Hardware in Belfair) and laid out on the surface of the beds.  I'm using loop stakes to hold the tubing in place now instead of eye pins; I found it was easier to take the tubing up and then lay it back down when I amend and replant a bed....


A second barb fitting was used to attach some 1/4" tubing to the 1/2" line in the beds ...


... and then this tubing was run over to the tomato boxes and a 1 GPH Drip Emitter was attached (I will be burying these lines soon to eliminate trip hazards).


That's it for the raised beds ... now for the greenhouse ...


A timer was attached to the faucet and then a Y Filter followed by a 3 Way Hose Splitter


 A T fitting was attached to one of the hose outlets and then a pressure regulator and Easy Loc Fitting with 1/2" tubing going to the greenhouse bench. 


 Barb fittings attach the 1/4" tubing and drip emitters that go to the plant trays ...


Another pressure regulator and Easy Loc Fitting attaches a second section of 1/2" tubing ...


... and more 1/4" tubing with drip emitters are connected with barbs for each of the container plantings ...


... including the hanging baskets.


It really didn't take very much time or effort and I like knowing that I can leave for a few days and my garden will be automatically watered using a water saving system :)


Enjoy!