Homesteading In The Pacific Northwest
Showing posts with label Recipes. Show all posts

Saturday, January 12, 2013

White Bean Soup In A Jar(s)

It was cold and damp earlier in the week and some bean soup with cornbread sounded like a good plan for dinner.  As long as I had all the ingredients out I decided to make up some jars to have for the next time.


The Ingredients
For the jars:
3 cups white beans (I used Cannelini since that is what I grow; you could use Great Northerns or Navy beans as well)
Freeze dried onions (1 tbsp), celery (2 tbsp) and carrots (2 tbsp)
Thyme (1 tsp), sage (1/2 tsp), celery seed (1/2 tsp), granulated garlic (1 tsp), ground black pepper (1/2 tsp), and 2 bay leaves

At time of cooking:
1 quart chicken stock (I could add bouillon to the spice mix but but the ingredients in bouillon are nasty!)
1/2 pint canned ham


For the bean and veggie jars:
Place 3 cups of beans into a quart canning jar.  Place the freeze dried veggies and herbs into a small plastic sandwich bag and place the bag on top of the beans.


Put a lid on the jar, vacuum and seal with a Foodsaver (you could add an O2 absorber ... I don't if I'm pretty sure I will be using this within a year).


Now our ingredients look like this ... just 3 jars.


There are two ways of going about cooking the soup.  The traditional way ...
Place beans in a large stock pot with water to cover 2 inches above beans; cover and let soak 8 hours or overnight. Drain, discarding the water. Add 2 quarts of water and 1 quart chicken stock to the beans.  Bring to a boil; cover, reduce heat, and simmer 2 hours or until beans are tender, stirring occasionally. Use a potato masher to break up some of the beans to make a thick soup. Add the contents of the plastic bag and the jar of ham and cook for another 1/2 hour.  Serve with cornbread (recipe coming soon.)

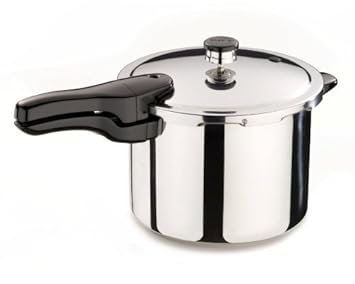
And then there's the quick way ... just about an hour from start to finish.  Place the dry beans in a 6 quart pressure cooker ...


Follow the directions for cooking dry beans that come with your cooker.  I use the one above made by Presto.  I fill the post half full with water and add 1 tbsp olive oil (keeps the beans from frothing up and blocking the steam valve).  I put the cover on, bring up to pressure on high heat and cook the beans for 20 minutes.  Remove the pot from the heat and let the pressure drop and drain the beans.  The beans look like this ...


Add 1 quart of water, 1 quart of chicken stock and the use a potato masher to break up the beans.  Add the contents of the plastic bag and the jar of ham.  Cook on medium for another half hour to 45 minutes.  Serve with cornbread.


Enjoy!


Wednesday, January 9, 2013

My Super Easy Artisan Bread Idea!

Originally Published Nov. 27, 2012

Updated Jan. 9, 2013

I love bread.  Good bread.  Crisp crust on the outside and chewy inside.  But I don't like the additives in most bakery breads ... YUCK!  When I first found Jim Lahey's "No Knead Artisan Bread" recipe I was ecstatic!  Now I could make my own, but .... I often forgot to start the dough the day before I wanted to have the bread (I'm an old fart ... memory is an issue) and dumping that super soft dough into the hot pot was always a case of hit or miss (and missing was messy!).

Next I found the "5 Minutes A Day" Artisan Bread recipe.  This one eliminates the memory issue (the dough can stay in the fridge for up to two weeks) but the sliding the dough off a pizza peel onto a hot stone was easier said than done and the hot water into a hot pan in the oven was tricky.

Last week, as I was preparing for Thanksgiving I was getting out my turkey roasting pan and an idea started to form ... what if I combined the No Knead method with the 5 Minute method?  YES!! It works!

So here is Deb's "Super Easy Artisan Bread" recipe.

Ingredients:
3 cups warm water
6 1/2 cups flour
2 tsp sea salt
1 1/2 tbsp instant yeast

(this is essentially the "5 Minute" recipe except it was way too salty so I cut the amount of added salt)

Dump all of the ingredients into a mixer bowl and mix on slow speed just until all the ingredients are combined and form a soft dough ...


Transfer the dough to a 5 quart container and cover leaving one corner open (the piece of foil on my container is to remind me.  If you close the container completely condensation will form on the lid and drip down onto the dough making it slimy).  Set the container somewhere warm to rise for 2 hours (it can go longer ... I've forgotten and left it overnight.  The bread was fine, just a little denser).


After 2 hours it should look like this ...


At this point you can pull out a chunk of dough and start a loaf or refrigerate the dough for up to 2 weeks, baking a loaf whenever you choose ... it will take about 1 hour from the time you start until your loaf comes out of the oven ... really!

This is the dough the next day ... I have sprinkled quite a bit of flour on a work surface and plopped a chunk of dough on it ...


I formed the dough into a loaf shape ...


... placed a piece of parchment paper onto a cookie sheet ...


 ... and set the loaf on the paper (I set the work surface with the flour aside ... I'm going to use it later). I then set the oven to 450 degrees, set a baking stone on the top oven rack, set the lid from my turkey roaster on top of the stone and closed the oven door.


I set a timer for 30 minutes.  When the timer went off I sprinkled the rest of the flour onto the risen loaf and made 4 slashes in the dough with a serrated knife (this allows the dough to expand as it is baking).


At this point I opened the oven door and (using pot holders) set the roaster lid aside (I just set it down onto the open oven door).   I slid the parchment paper with the loaf from the cookie sheet onto the hot baking stone (no cornmeal, no pizza peels and no trying to transfer sticky bread dough into a hot pot!)


I set the roaster pan lid over the loaf ...


... set the timer for another 30 minutes (and when it went off I lifted the roaster lid off of the stone and set my bread on a rack to cool.


Isn't it beautiful?

For a round loaf I formed the dough into a ball ...


... let it raise for 30 minutes while the over warmed up, then dusted the loaf with flour and slashed the top into a tic-tac-toe pattern...


... transferred the dough onto the hot baking stone and covered with the hot lid (actually I used the bottom of the roaster for this loaf ... when I baked the first round loaf the top came out flat and I realized that the round loaf rises higher and had hit the top of the lid while baking.  Not a problem ... the bottom of the roaster works fine).

After 30 minutes I removed the bread from the oven and set it onto a rack to cool ...


Ta Dah!

Update: Jan. 9, 2013

We've had some foul weather lately with power outages and I got to thinking about this bread.  I am now baking almost all of our bread  myself but if the power goes out the generator will not run the oven on my stove.  So I wondered about baking it in the fire place and yesterday I gave it a try.  


I let the fire burn down to a good layer of coals and then moved them over to the right of the fireplace.  I set the lid of a larger Dutch over on top of the coals (makes it easier to lift the baking oven  out of the hearth) and set a small Dutch oven with its' lid in to preheat for 30 minutes while the loaf rose.  


Wearing heavy welder's gloves (I had these to use with my kiln when I'm enameling) I lifted the Dutch out of the fireplace, removed the lid and set the raised loaf into the pot.  I set the pot back into the fireplace.  After 15 minutes I checked it and decided to turn the pot around (I could tell that the right side was cooking faster).  After another 15 minutes I removed the Dutch oven from the fireplace and ...


Ta Dah!  A perfect loaf of bread :)

And since I already had the fireplace all set up for cooking I decided to start a mess of ribs ...


... but that will be another story ;)


Notes: 
1) The recipe makes 3-4 smallish loaves (perfect for the two of us here).  If you make larger loaves increase the baking time by 5 - 10 minutes.
2) During our cool winter months here in Western Washington I am able to store the dough container outside on the porch so it doesn't take up room in the fridge.
3) For Thanksgiving Dinner I formed the dough into a dozen small balls (about halfway between a golf ball and a tennis ball), set them in a group in the middle of a piece of parchment, let raise, slashed as for the round loaf above and baked for 20 minutes ... perfect dinner rolls!


Enjoy!


Monday, December 10, 2012

Harvest Monday and Kalamata Olive and Rosemary Artisan Bread

The Dark Days are here and it will soon be winter.  I have a few greens started in the greenhouse but no harvests to report. I'm joining other bloggers over at Daphne's Dandelions as we share our weekly harvests (or lack of same) ... it's fun to see what others are harvesting and what they are cooking up with it...check it out!

I've been playing with my Easy Artisan Bread Recipe .  I'm still working on a wheat variation but the Kalamata and Rosemary Loaf is a keeper!


The recipe starts out the same as for my basic Easy Artisan Bread ...

Ingredients:
3 cups warm water
6 1/2 cups flour
2 tsp sea salt
1 1/2 tbsp instant yeast

Dump all of the ingredients into a mixer bowl and mix on slow speed just until all the ingredients are combined and form a soft dough ...


After mixing I removed half of the dough and set it on the hearth to raise for some plain loaves and then added chopped Kalamata olives, chopped fresh rosemary and some coarsely ground black pepper to the dough remaining in the bowl ...


... turned the mixer back on for about a minute, dumped the dough into another plastic container ...


... and set it on the hearth to raise for 2 hours.  I put the dough in the refrigerator overnight and the next afternoon formed half of it into a loaf on a piece of parchment paper. I set the oven to 450 degrees, set a baking stone on the top oven rack, set the lid from my turkey roaster on top of the stone and closed the oven door. 


 After 30 minutes I sprinkled the rest of the flour onto the risen loaf and made 3 slashes in the dough with a serrated knife ...


I opened the oven door and (using pot holders) set the roaster lid aside, slid the parchment paper with the loaf onto the hot baking stone and covered it with the hot lid.  30 minutes later I had a beautiful loaf of fragrant olive and rosemary bread.  It was great with a bowl of my "Countdown Beef Stew"  (recipe coming soon).


Enjoy!


Wednesday, November 7, 2012

Pumpkin Bread Mix In A Jar


For the mix, layer the following in a quart canning jar in order given:
2 cups flour
1/2 cup sugar
1 tsp baking soda
1tsp salt
1/2 tsp ground cinnamon
1/2 tsp ground cloves
1/2 tsp ground nutmeg
1/2 cup chopped walnuts or pecans
1/2 cup raisins

Additional Ingredients:
1 cup mashed pumpkin
1/2 cup plain low-fat yogurt
1/2 cup honey
1/4 cup softened butter
2 large eggs

Optional:
Sprinkling sugar crystals

Place the pumpkin, yogurt, honey, butter and eggs in a large bowl and stir together with a fork.  Add mix ingredients to the wet ingredients, stirring just until moistened.  Spoon batter into a greased loaf pan, sprinkle with sugar if desired and bake at 350 degrees for 50 to 60 minutes (check for doneness with a toothpick).  Cool in pan for 10 minutes and then turn out onto a rack and allow to cool.


Enjoy!


Monday, November 5, 2012

Meals In Jars ... Chicken Noodle Soup


Chicken Noodle Soup

1) I sauteed the chicken and vegetables with some herbs in a bit of olive oil and then froze it in a Food Saver bag. Of course, you could can it as well, as long as you keep the noodles separate.

 2) A quart of homemade chicken stock

 3) A pint of uncooked egg noodles.

Dump the stock in a pot and bring to a boil. Add the noodles and simmer for about 8 minutes. Add the chicken and veggies and continue to cook until everything is heated through.

Enjoy!


Friday, July 6, 2012

Sauerkraut

I'm joining other bloggers over at Daphne's Dandelions as we share our weekly harvests...it's fun to see what others are harvesting and what they are cooking up with it...check it out!


Peas, cabbage, lettuce and radishes we re all harvested last week.  I am still ridiculously happy about the way my cabbages turned out this year!  One of them took center stage on Saturday as I made my first batch of fermented sauerkraut ...


The Ingredients:
1 head cabbage, shredded
1/2 onion, thinly sliced
3 carrots, peeled and shredded
1 tbsp sea salt

Plus ...


1/2 cup whey drained from a container of organic yogurt


I mixed all of the ingredients together in a big bowl, pounded it with a potato masher for about 10 minutes and then transferred the mixture to a big glass crock.  I put two of the leaves from the cabbage on top of the shredded cabbage mixture and then weighted it all down with a zip lock bag full of water.


I put the jar in one of my pantries (dark and room temperature) After 2 days it is starting to bubble a bit and I can smell that the fermentation process is beginning.  I'll let it sit for another day or two and then transfer the crock to the refrigerator.  I'll keep you posted on how it turns out ...

Enjoy!

07/06/2012 : Update

I let the crock sit out at room temperature for 2 more (a total of 4) days then I transferred to the refrigerator.  It took another week before it got to the degree of "sour" that I liked and has been steadily getting better as it continues to age.  This one is a keeper!


Kraut on a Brot : )


Wednesday, June 27, 2012

Strawberries!

Strawberry season in Washington State is short and sweet.  Very sweet :)  The start of strawberry season pretty much coincides with the the Summer Solstice; June 21 (I'd say the start of summer but everyone knows that summer in Washington doesn't arrive until July 12.  You did know that, didn't you?).  So about June 18th or so I start asking my "Local Guy" ... "Are the ready yet?"  Last week I asked on Wednesday and he told me "They'll be here Friday" ... YES!!  I now have 4 flats frozen and another 2 turned in "Food of the Gods" ... Strawberry Vanilla Jam ...

I first found this recipe on "Food In Jars" last spring and adapted it just a bit ...


Ingredients:

8 cups strawberries, halved
4 cups cane sugar
3 vanilla beans
juice and zest of 1/4 lemon

Split the vanilla beans and scrape out the seeds ...


Place the vanilla beans and seeds, the strawberries and 2 cups of the sugar in a zip lock bag
 and allow to macerate overnight.


Hint: prepare several bags, allow them to sit overnight, process one into jam and freeze the rest ... all ready to be processed into jam at a later date ...


The next day place the contents of the bag and the remaining sugar in a heavy bottomed pot and cook over medium high heat until it reaches 220 degrees/gel stage, stirring often ... this will take 2 to 3 hours ... remember "Patience is a virtue."


While the jam is cooking prepare 6 to 8 half pint jars, lids and rings for canning ... I usually end up with 6 full half pints that I process and about 2/3 of another one that goes into the fridge ... 


Remove the vanilla beans from the pot and ladle the hot jam into the hot jars leaving 1/4 inch head space.  Add lids and rings and process in a hot water bath for 10 minutes.


Enjoy!